Is there an easy way for you to migrate shared hosting to the cloud? But the lack of confidence is holding you back from migrating? Then you are at the right place.
Shared hosting platforms share everything, which means your site suffers when a neighbor gets hammered, your backups are someone else’s priority, and scaling is impossible without rebuilding completely. The shift toward shared hosting to cloud migration has accelerated because businesses finally understand the real cost of staying stuck. Modern migration tools, such as FlexiCloud Panel, have removed the fear factor that keeps users stuck with website downtime during migration and opened up an easy path to migration.
This guide hands you the complete roadmap for how to move your website from shared hosting to cloud, reducing downtime, and understanding exactly which cloud option fits your needs. You’ll learn the pre-migration checklist, step-by-step transfer procedures, and post-launch verification that guarantees nothing broke.
Benefits of Moving from Shared Hosting to Cloud
Your hosting limitation is secretly holding back your business growth. Whenever your site can’t handle a traffic spike, the slowdown will frustrate users. With that, every outage that costs revenue and shared hosting is the root cause. You’ve probably already felt this constraint but thought migration was too risky or complicated.
Here’s what actually happens when you migrate shared hosting to the cloud with modern tools and proper planning. They are;
- Load times drop noticeably because resources are allocated directly to your site, not shared.
- You control your entire infrastructure, choosing exactly which services and versions you need.
- Growth doesn’t require rearchitecting your setup or migrating again next year.
- System uptime reaches industry-leading standards with automatic failover and redundancy.
- Compliance becomes easier with built-in encryption, audit logging, and security frameworks.
- Billing stays transparent with granular controls showing cost per service and per usage tier.
- Server management becomes simpler through dashboards and APIs, not limited to control panels.
- Performance optimization gets easier with built-in caching, CDN integration, and database tuning.
- Disaster scenarios get handled automatically instead of becoming existential crises requiring manual recovery.
Shared to Cloud Hosting – Your Pre-Migration Checklist
Your old hosting account won’t stay online forever, and you can’t migrate successfully without the information sitting in front of you. Users often discover mid-migration that they forgot a critical password or DNS detail, forcing them to scramble or restart. The real protection comes from treating step-by-step shared hosting to cloud migration preparation as its own project that runs for a few days before you touch anything. These are the essentials:
- Perform a complete file backup, including directories that your host might not show in their backup manager.
- Export your database as a standalone SQL file, then import it locally to confirm no corruption exists.
- Document every email account, including authentication credentials, forwarding addresses, and any vacation messages.
- Now go to your domain registrar, log in, and copy down all active DNS records exactly as they appear.
- Review the actual server log and pick your cloud hosting plan. Do go by guessing what you need.
- Verify plugin and theme versions work on your cloud provider’s specific PHP release and server configuration.
- Make sure you have stable login access to both your existing host and your new cloud account (eg, FlexiCloud) before starting anything.
Step-by-Step Migration Process Using Flexicloud Panel
Today, when you migrate shared hosting to cloud hosting, you don’t require technical knowledge. Why? Because of FlexiCloud and other intuitive modern hosting control panels that makes the process is made simple.
Cloud adoption is now easier than you think. FlexiCloud presents you with a complete dashboard that manages file uploads, database management, and server control seamlessly. It avoids the usual headaches, especially when you want a reliable way to perform a zero-downtime website migration to the cloud.
Use our step-by-step shared hosting to cloud migration guide using FlexiCloud Panel:
- Your first steps involve preparing the source website. Export the database using backup plugins or via phpMyAdmin and take a full backup of the files.
Since the FlexiCloud Panel dashboard includes a built-in File Manager, you don’t need SSH or FTP for any basic migrations. Here’s all you will do:
- Log in to the FlexiCloud Panel dashboard using your credentials.
- Now go to the Server and select the website that you want to migrate from shared hosting to cloud.
- From the left panel, launch File Manager.

- On the right File Manager panel, either drag-and-drop the entire folder or upload your website ZIP file.

- Next, extract the ZIP file into the public_html directory or into the document root.
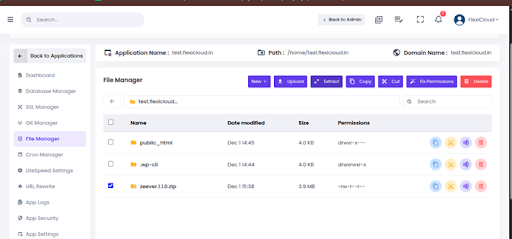

- Lastly, check if all the files and folders are correctly placed.
Steps for Importing Database via phpMyAdmin
With the FlexiCloud panel, you get easy access to phpMyAdmin. Here are the steps:
- First, go to the Database Management option and create a new database and a database user. At this step, make sure you note down the credentials.
- From the panel, launch phpMyAdmin
- FlexiCloud provides easy access to phpMyAdmin through the panel.
- Next, select the newly created database, click on Import, and upload your SQL file.
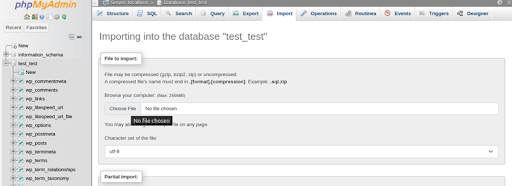
Do not close the window until the import finalizes.
Tips for Zero-Downtime Website Migration to Cloud
Skipping the staging environment is asking for trouble. You need a safe space to run the entire migration process first, test every page, verify database connections, and catch errors before your visitors ever see them.
Build an exact replica of your live site, execute the full transfer, then validate functionality thoroughly. This rehearsal catches problems that would otherwise break your live site.
FlexiCloud’s integrated panel simplifies creating staging environments and managing transitions. Go deeper into staging strategies and troubleshooting common downtime causes if you want a zero-downtime website migration to the cloud.
Shared Hosting to Cloud Hosting – Post-Migration Optimization
Your site’s now on cloud hosting. Time to make it actually run properly.
Step 1: Enable Redis. Most cloud hosts have it available. It caches things in memory so your database gets a break.
Step 2: Switch to PHP 8.x if you’re still on PHP 7. The speed difference is real, and users notice faster load times.
Step 3: Get a CDN configured. Cloudflare is easy. Your static files get served from edge servers instead of your main box.
Step 4: Measure performance. Use Lighthouse or GTmetrix. See what scores you actually get.
Step 5: Enable OPcache in your hosting panel. One-click and PHP stops recompiling code on every request.
Step 6: Check if your database has the right indexes. Missing indexes make queries painfully slow.
Step 7: Lazy load your images. So, the page renders faster initially instead of waiting for everything to load.
The whole point of migrating shared hosting to the cloud is speed and reliability. These steps deliver on that promise.
Common Issues Faced During Shared Hosting to Cloud Migration
Most migration problems follow a pattern. Here’s what happens and what actually fixes it.
Database errors mean your site and database can’t communicate. When the wp-config.php credentials don’t match the ones existing on the new server, the address to the database host is probably wrong. In that case, you must check your hosting panel and verify the exact database name and credentials. Next, update wp-config.php to match so that you can finally test the connection yourself using those credentials before assuming the migration failed.
SSL problems show as “not secure” warnings even though you have a certificate. Either it expired, doesn’t cover your domain, or the mixed content (some files loading from HTTP instead of HTTPS) is triggering the warning. Reinstall the certificate if needed and make sure WordPress admin settings use HTTPS for both the site URL and home URL. Search for any hardcoded HTTP URLs in your content and change them to HTTPS.
Missing or broken images mean the uploads folder didn’t transfer completely, or file permissions prevent the server from reading them. Check that the wp-content/uploads exists with all your media files. Set directory permissions to 755 and file permissions to 644. Sometimes you need to check file ownership too, usually www-data or similar.
Plugins causing errors usually mean they’re not compatible with your new PHP version or are trying to load functionality your new server doesn’t have. Here, you must check wp-content/debug.log for error messages. Next, find out the problem plugin so that you can either update it or replace it with something compatible.
Contact forms failing to send happen because your mail server settings have changed, or the new host blocks outbound mail on standard ports. Update your mail plugin settings to use your new host’s SMTP server details or ask your hosting support about mail relay options.
Password resets not working indicates your server can’t send emails, or the reset link is pointing to the old domain. Fix email first, then check that WordPress settings use your new domain everywhere. The reality is that when you execute a shared hosting to cloud migration with testing beforehand, most of these issues never surface at all.
Why Shared Hosting to Cloud Migrations Fail? (Common Mistakes to Avoid)
You may think you have backed up everything, but maybe you just saved the obvious files. Most content, including the hidden configuration files, custom code directories, email accounts, and database settings, is usually saved in folders that people miss. Manual backup and testing are the only ways to know you actually have everything.
TTL stays at 24 hours because you never changed it. This sounds minor, but it’s a major fact. When you finally update your DNS, that old address stays cached on resolvers worldwide for an entire day. Cut TTL to 300 seconds beforehand so propagation happens in minutes instead.
One test run isn’t enough to catch everything. You test locally, things work, then on the actual new server, something breaks because the environment is different. Build a complete staging copy of your site, migrate everything to it exactly as planned, then verify every single feature works before touching production.
Your site has live transactions and updates happening during migration. You started copying the database at 2 am, but by 4 am, when you were finished, the new orders that had arrived didn’t even exist in your backup. Plan for database sync or take the site temporarily offline to prevent this mismatch.
You choose to migrate on a Tuesday or Wednesday at 3 PM, and that’s when time creates chaos. So, it’s smart to pick your slowest traffic period, having time to handle problems, and your team to assist. Rushing migrations is how you end up on the phone with support at midnight.
Post-Migration Verification Checklist
- Your DNS has to point to the right place. Log in to your registrar and confirm nameservers match your cloud provider’s details. Later, use a DNS propagation check tool and see if changes have spread globally. It usually takes a few hours, but sometimes longer.
- SSL works, and visitors see the padlock icon. Your certificate covers the correct domain and isn’t expired. If browsers still show warnings, your certificate didn’t install properly, or mixed content is loading from HTTP instead of HTTPS.
- Check that caching gets cleared completely, so old content doesn’t confuse you. WordPress cache, server cache, browser cache, and CDN cache all need flushing. A stale cache makes it impossible to know if your migration actually worked.
- Need to confirm that backups that are automated are configured and running. Instead of relying on luck next time something breaks, enable daily backups now and verify that your first backup finished successfully.
- Check monitoring is active and watching for outages. Don’t wait for customers to tell you your website is down. Use uptime monitoring platforms such as UptimeRobot or Pingdom to send you real-time alerts when your site becomes unavailable, helping you act fast.
- You know, Google Search Console always notices your new location. Upload your sitemap and request indexing so Google crawls your new server and updates search results. This prevents SEO damage from appearing to have a dead site.
- Examine login functionality works for admin and other users. Test creating an account, logging in, and accessing protected content. Authentication systems sometimes break during migration.
- Email from contact forms actually sends to your inbox. Test the contact form yourself and check spam folders too. Mail delivery fails silently sometimes, so you need to verify it works.
- Database queries execute quickly without timeouts. Run a few database-heavy operations like loading your product catalog or user list. Slow queries indicate sync or indexing problems.
This checklist distinguishes websites that are working properly from those that are not after the shared hosting to cloud migration is complete.
FAQs
The process is usually not longer than 2-4 hours, but if your website has a larger database, it may take 8-12 hours. The added hours are due to waiting for DNS to propagate globally.
Will my email work during migration?If you skip updating the mail server settings, the email will stop working temporarily during server migration. Therefore, always document your SMTP settings, create the same email accounts (on the new server) and then finally update the settings after DNS propagates.
Is it important to buy a new domain when moving to the cloud?Actually, no, your original domain stays even after migration. Simply update the nameservers or DNS A records to point to the IP address of your new cloud.
What's more expensive – Cloud hosting or Shared hosting?Cloud hosting is a pay-as-you-go model, whereas shared hosting has fixed monthly/ yearly charges. None is expensive, but if you have tiny static sites, you will find shared hosting more affordable but compromise on performance.
Can I move back to shared hosting from cloud?Yes, migrating back to shared hosting is possible and it will take similar time as it did for the initial cloud transition. However, once you will experience performance and reliability at cloud, you may never want to go back to shared or any other hosting type.
Conclusion
Shared hosting works fine until it doesn’t. Then your site crawls and goes down at the worst times, and there’s nothing you can do about it because it’s someone else’s server. Moving to the cloud fixes that permanently. When you do shared hosting to cloud migration properly, you control your destiny. The process to migrate shared hosting to the cloud might take a few hours, but it buys you years of reliability and breathing room to actually grow your business instead of fighting your infrastructure.
If you are new to hosting migration or still confused, reach out to the FlexiCloud expert team for your ultimate assistance.
