
What is Redis

If you’ve ever wanted your apps to be faster, Redis is your friend. Short for Remote Dictionary Server, Redis stores data in memory, which means your app can access it lightning-fast. That’s why it’s one of the most popular databases today.
You can rely on Redis for different jobs. It can be set up as a database, a fast cache, or even a message broker for handling communication.
Some of the common uses of Redis are:
- Caching: Keep the most-used data ready so your app doesn’t slow down.
- Sessions & Messaging: Track users, jobs, or notifications easily.
It handles different data types too:
- Dictionaries / Hashes for key-value storage
- Lists to keep items in order
- Strings for simple text and numbers
This tutorial will walk you through how to install Redis on Ubuntu 22.04. We will cover each step clearly so that you can install Redis in Ubuntu 22.04, start it up, and make sure it is working on your system.
A Look into Prerequisite
Installing Redis in Ubuntu 22.04 isn’t the first step; you need to prepare your server before that. Here are the prerequisites that will make installation smoother preventing all common errors. Do not miss this:
- Ubuntu 22.04 Server: A server running Ubuntu 22.04 LTS is mandatory. This server is a stable, widely supported, and offers the right environment for Redis to run efficiently.
- Sudo / Root Privileges: Administrative privileges are non-negotiable. Only if you use sudo or root rights can you install software, manage services, and modify configuration files. Otherwise, commands like install Redis-cli Ubuntu will fail.
- Updated Package List: Run sudo apt update to refresh your package information. By doing this, you will get the latest Redis version along with all necessary dependencies. This step is also important to prevent errors during installation.
Steps to install Redis in Ubuntu 22.04
Now, let’s move on to the detailed steps to install Redis on Ubuntu 22.04, then let’s get started.
Step 1 — Update System Packages
Before you install Redis on Ubuntu 22.04, verify your system packages are up to date.
Now start by running the following commands:

sudo apt update
This updates your package index and upgrades any outdated software, reducing installation errors.
Step 2 — Install Redis from Ubuntu Repository
Use the default Ubuntu package and install Redis:
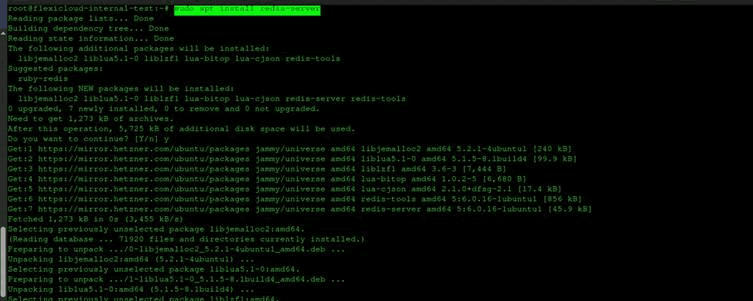
sudo apt install redis-server
You must now check the Redis version (installed). Use the following command:
redis-server -v

and verify your installation.
Step 3 — Manage Redis Service
Installing Redis isn’t the game alone. Then what? You also need to learn how to control Redis as a service.
Start, enable, and check the Redis service:
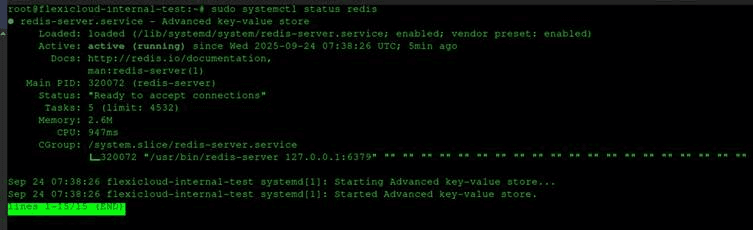
To test connectivity and check if the Redis instance is running, use the command –
sudo systemctl status redis
To quickly start Redis, run the systemctl start command:
sudo systemctl start redis
You will instantly see the Redis server starting and letting your applications connect (to use later). But Redis doesn’t run until you start it.
But, if you want Redis to start with every server restart, use the command:
sudo systemctl enable redis
Once you use the above command, a manual start after every reboot is not compulsory. It is helpful if the uptime in the production environment is critical.
Now you can’t randomly start Redis, but first make a crucial change in the default configuration file.
You need to access the redis.conf configuration file with any preferred text editor.
sudo nano /etc/redis/redis.conf
Before you exit the file configuration, save the changes.
To make the changes in effect, restart the Redis server.
sudo systemctl restart redis
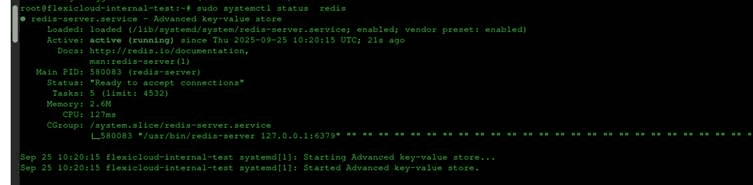
Run the said command:
sudo systemctl status redis
Step 4 — It’s Time to Configure Redis
Start with binding Redis to the local host. You will see Redis listed on all network interfaces by default. Since this can expose it to the internet, you must restrict access to your own server. Run
bind 127.0.0.1
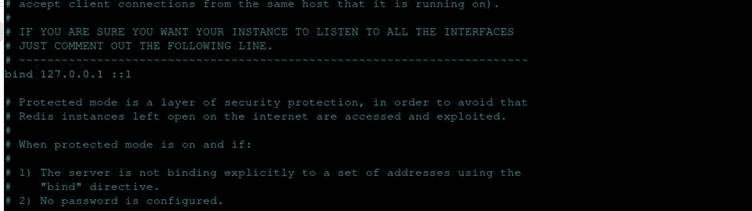
This step is very important to make sure that only apps running on the same server can connect to Redis.
For a remote connection from anywhere, you must set the bind attribute to 0.0.0.0
– It’s time to set a password in redis.conf
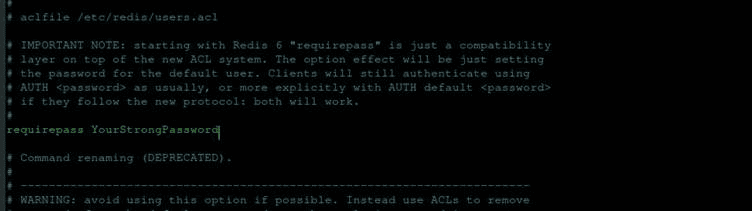
In the Redis configuration file, add a strong password that you will later authenticate for every access.
Step 5 — Test Redis Installation Using redis-cli to connect
Once you have installed Redis on Ubuntu, start the next step. Your next step requires testing it and figuring out if the server is working as it should.
To find so, use the redis-cli command-line tool and connect the server.
Soon after running the command, the prompt will change to 127.0.0.1:6379.
You are now working on the Redis shell.
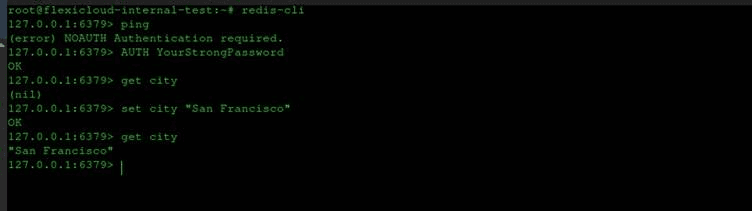
Next, run the ping command to test the connectivity.
Ping

It will instantly show the output PONG. Take it as a confirmation that Redis is functioning as expected.
If Redis show an error that we need to authenticate, use the AUTH command with your password (we recently made in one of the above steps the configuration file).
Command:
AUTH password
The correct password will show you OK as the output.
Now run the exit command to exit from the Redis shell:
Exit
Step 6 — (Optional) Uninstall or Remove the Latest Redis Version
# Remove Redis packages sudo apt purge
–autoremove redis-server -y
# Remove Redis configuration files (if any remain)
sudo rm -rf /etc/redis /var/lib/redis
/var/log/redis
# Verify Redis is
removed with
redis-server
What are the Advantages of Using Redis?
Using Redis means you sign in for a lot of benefits for your applications. While the list is long, we have picked some of the most appealing and key advantages:
- Redis makes it possible to keep very large key-value pairs. Each entry can hold up to 512 MB, so in practice, one can go up to a size of nearly 1 GB. This removes the need to divide large pieces of information into parts.
- The system offers smart replication through a master slave model. The master applies any update, and the slave servers follow automatically. This can happen asynchronously, which benefits speed and reduces waiting delays.
- High availability is one of the strong points of Redis. If some servers face issues, the other replicas continue to respond. This ensures that the cache remains active and services are not disrupted.
- Redis connects easily with many coding languages. Support exists for languages such as C, Ruby, Java, JavaScript and Python. For developers, this makes it flexible, and one can always check the Redis Wikipedia page for the full range of supported languages.
- It works with a protocol known as RESP. This protocol is easy to understand, clear to read, and keeps the exchange between client and server simple.
- Redis also gives a fast option for loading big sets of entries. You can add millions of data points without long delays, which is highly useful when working with large applications or preloading caches.
Redis on FlexiCloud
Just forget complicated command lines and deep learning curves. As a FlexiCloud customer, if your server requires Redis, our expert team will handle the entire installation and configuration process for you, absolutely free of charge. Unlike other providers who charge for this essential process, we ensure that your Redis is fully set up and ready to use. All you have to do is connect with us for a while, no technical expertise required.
FAQs
1. How to check Redis version on Ubuntu?
Install Redis on Ubuntu, open a terminal and type redis-server -v, that’s how you will see the version. Simply check if Redis is really installed and working, nothing fancy.
2. Is Redis installed by default on Ubuntu?
Not it is not. Redis isn’t already installed in Ubuntu. But you can install Redis on Ubuntu using sudo apt install redis-server. Once you do so, start using it normally.
3. How to restart the Redis service?
It is very simple. If you change any setting or there’s an update, you need to restart Redis. So, to do so, go to the terminal, copy and paste sudo systemctl restart redis. That’s it, the service will restart.
4. Where is the Redis configuration file located?
Don’t get confused, as locating the Redis configuration files is easy.
At Ubuntu, the Redis configuration file is stored at /etc/redis/redis.conf. Try opening it with a text editor. Upon installing Redis on Ubuntu, you can modify the settings as well.
Conclusion
This was a clear and smooth guide covering all your queries on how to install Redis on Ubuntu 22.04. We started from system updating to installing the package and straight to checking the service. While every step is necessary, the most important it to test with redis-cli. Later, set basic security, and here you have everything that was required.
Once Redis starts running in your system, use it to cache data. It’s your turn to streamline your apps, manage sessions, and finally build queues for background tasks. While you do everything else, keep an eye on commands like SET, GET, and PING to get comfortable.
Overall, Redis is fast but lightweight. Every small change takes you to a bigger difference. Remember it is important to practice these steps and check the service status regularly. In between all of this, make sure your password is extremely secure. Once confident and past all of this hustle, try optional features like persistence or installing the latest Redis version.
At the end, your Ubuntu server is ready to handle faster, more efficient applications.
